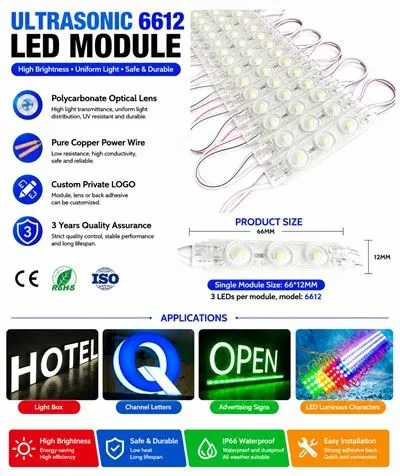
Hey there! As a supplier of Ultrasonic Led Modules, I'm super stoked to share some tips on how to control these nifty gadgets. Whether you're a DIY enthusiast, a professional in the lighting industry, or just someone looking to add a bit of coolness to your space, this guide is for you.


First off, let's understand what an Ultrasonic Led Module is. It's a combination of ultrasonic technology and LED lighting. The ultrasonic part can be used for various functions like motion detection, distance sensing, and more, while the LED provides the lighting. This makes it a versatile component for all sorts of applications, from home automation to commercial signage.
Understanding the Basics of Control
Before we dive into the nitty - gritty of control methods, it's essential to know the basic components of an Ultrasonic Led Module. Typically, it consists of an ultrasonic sensor, an LED driver, and the LED itself. The ultrasonic sensor detects changes in the environment, and based on that, the LED driver controls the brightness, color, or on/off state of the LED.
Power Supply
The first step in controlling an Ultrasonic Led Module is getting the power supply right. Most modules work with a standard DC power supply, usually 12V or 24V. Make sure you use a reliable power source that can provide a stable voltage. Fluctuations in voltage can not only affect the performance of the module but also reduce its lifespan.
Wiring
Proper wiring is crucial. Connect the power supply to the appropriate terminals on the module. Usually, there are positive and negative terminals clearly marked. Double - check your connections to avoid short - circuits, which can damage the module.
Manual Control
One of the simplest ways to control an Ultrasonic Led Module is through manual control. This can be done using a basic switch. You can turn the module on or off as needed. Some modules also come with a dimmer switch, which allows you to adjust the brightness of the LED.
If you're using the module for a simple lighting setup, like in a small room or a display case, manual control might be all you need. It's straightforward and doesn't require any complex programming or additional equipment.
Remote Control
For more convenience, remote control is a great option. Many Ultrasonic Led Modules come with a remote control that allows you to control the on/off state, brightness, and even color (if it's a RGB module). With a remote, you can adjust the lighting from a distance, which is super handy, especially in large spaces.
The remote control usually communicates with the module via infrared or radio frequency signals. Make sure to keep the remote in a safe place and replace the batteries when needed.
Programmable Control
If you want more advanced control over your Ultrasonic Led Module, programmable control is the way to go. You can use a microcontroller like Arduino or Raspberry Pi to program the module to respond to different conditions.
Using Arduino
Arduino is a popular open - source electronics platform that's easy to use. You can connect the Ultrasonic Led Module to an Arduino board and write a simple program to control it. For example, you can program the module to turn on when the ultrasonic sensor detects motion within a certain range.
Here's a simple example of an Arduino code to control an Ultrasonic Led Module based on motion detection:
const int trigPin = 9;
const int echoPin = 10;
const int ledPin = 13;

void setup() {
  pinMode(trigPin, OUTPUT);
  pinMode(echoPin, INPUT);
  pinMode(ledPin, OUTPUT);
  Serial.begin(9600);
}

void loop() {
  long duration, distance;
  digitalWrite(trigPin, LOW);
  delayMicroseconds(2);
  digitalWrite(trigPin, HIGH);
  delayMicroseconds(10);
  digitalWrite(trigPin, LOW);
  duration = pulseIn(echoPin, HIGH);
  distance = duration * 0.034 / 2;
  if (distance < 50) {
    digitalWrite(ledPin, HIGH);
  } else {
    digitalWrite(ledPin, LOW);
  }
  delay(100);
}
This code uses the ultrasonic sensor to measure the distance. If the distance is less than 50 cm, the LED turns on; otherwise, it turns off.
Using Raspberry Pi
Raspberry Pi is a more powerful single - board computer. It can handle more complex tasks and can be connected to a network. You can use Python programming language to control the Ultrasonic Led Module. With a Raspberry Pi, you can even integrate the module into a home automation system, allowing you to control it using your smartphone or a smart home assistant.
Integration with Other Devices
Another cool way to control an Ultrasonic Led Module is by integrating it with other devices. For example, you can connect it to a smart home hub like Amazon Alexa or Google Home. This allows you to control the module using voice commands.
You can also integrate the module with other sensors, like temperature sensors or light sensors. For instance, you can program the module to adjust its brightness based on the ambient light level or turn on when the temperature drops below a certain point.
Applications of Ultrasonic Led Modules
Ultrasonic Led Modules have a wide range of applications. In the home, they can be used for security lighting, where the LED turns on when someone approaches. In commercial settings, they can be used for dynamic signage. For example, the Injection LED Light Module For Sign Channel Letter can be enhanced with ultrasonic control to attract more attention.
The 5050 LED RGB Module is great for creating colorful lighting effects in clubs, bars, or event venues. You can use the programmable control methods mentioned above to create unique lighting shows.
The 12v/24v RGB COB LED Strip Light can be used for decorative lighting in homes or offices. By integrating it with an Ultrasonic Led Module, you can add a touch of interactivity to the lighting.
Troubleshooting
If you're having problems with your Ultrasonic Led Module, here are some common issues and solutions:
- Module not turning on: Check the power supply and wiring. Make sure the power source is working and the connections are secure.
- Inconsistent performance: This could be due to a faulty ultrasonic sensor or a problem with the programming. Try replacing the sensor or checking your code for errors.
- Color issues (RGB modules): Make sure the RGB channels are correctly configured. Sometimes, a loose connection or a problem with the driver can cause color discrepancies.
Conclusion
Controlling an Ultrasonic Led Module can be as simple or as complex as you want it to be. Whether you choose manual control, remote control, or programmable control, there are plenty of options to suit your needs.
If you're interested in purchasing Ultrasonic Led Modules or have any questions about controlling them, feel free to reach out. We're here to help you make the most of these amazing lighting modules.
References
- Arduino official documentation
- Raspberry Pi official documentation
- Ultrasonic sensor datasheets
- LED module product manuals